Connect with us

Matcha Tea

How To Make Matcha Latte With Milk Frother

Published

on

I absolutely adore matcha lattes and have long been eager to master making them myself. Despite several initial mishaps, I ultimately unlocked the key to crafting the ideal matcha latte: employing a milk frother! The use of a milk frother simplifies the preparation immensely, while also producing a velvety, airy consistency that seems almost impossible to attain in its absence.

In this article, I’ll walk you through the steps of making a matcha latte with a milk frother. We’ll start by discussing what exactly matcha is and what ingredients you’ll need to gather. Then, I’ll guide you through the process of preparing the matcha powder and frothing the milk. We’ll also cover some tips for getting the perfect froth and troubleshooting common issues.

By the end of this article, you’ll be able to enjoy a delicious matcha latte in the comfort of your own home.

Key Takeaways

  • Milk frother is an essential tool for making a perfect matcha latte.
  • Different milk types, temperatures, and frothing techniques can affect foam consistency.
  • Experiment with milk alternatives, sweeteners, and optional additions to find a preferred taste.
  • Homemade matcha latte is a great way to incorporate antioxidants into your diet and enjoy a pick-me-up beverage.

What is Matcha?

So, you’re ready to make a matcha latte with your milk frother, but do you know what matcha actually is?

Matcha is a finely ground powder made from specially grown green tea leaves. Unlike traditional green tea, where the leaves are steeped and then discarded, matcha is whisked into water or milk and consumed in its entirety. This means that you get all of the benefits of green tea, including antioxidants and caffeine, in every sip.

Matcha is available in different grades, each with its own unique flavor, texture, and color. The highest grade, ceremonial matcha, is made from the youngest leaves and has a bright green color, smooth texture, and delicate flavor. This is the most expensive and is typically used for traditional tea ceremonies.

Advertisement

The next grade down, premium matcha, is slightly less expensive and has a slightly stronger flavor and darker color. The lowest grade, culinary matcha, is still high quality but is typically used in cooking and baking rather than drinking.

Now that you know what matcha is and the different grades available, it’s time to gather the necessary ingredients to make your matcha latte with a milk frother.

Gathering the Necessary Ingredients

First, you’ll want to grab all the goodies that’ll make your taste buds dance with joy. Gather up the creamy milk, the vibrant matcha powder, and any sweeteners you desire.

Choosing the right milk is essential to creating a perfect matcha latte. I recommend using whole milk or oat milk for a creamy, rich texture that complements the matcha flavor. Soy milk or almond milk can also be used, but they may alter the taste slightly. Experimenting with flavors is another fun way to spice up your latte. Vanilla extract or honey are great options that add a touch of sweetness without overpowering the matcha.

Next, measure out the matcha powder. You’ll need about 2 teaspoons for a single serving of matcha latte. Make sure to sift the matcha powder through a fine mesh sieve to prevent any clumps from forming. This will ensure a smooth and even consistency in your latte.

Advertisement

Now that you’ve gathered all the necessary ingredients and prepared the matcha powder, it’s time to move on to the next step: preparing the milk.

Preparing the Matcha Powder

First, I like to sift the matcha powder to remove any clumps and ensure a smooth texture. This is important because it helps to prevent any lumps or grains from forming in the final product.

Next, I add hot water to the matcha powder and whisk vigorously until it becomes frothy and well-mixed. This step is crucial because it helps to activate the flavor and aroma of the matcha powder, ensuring a rich and delicious taste.

Finally, I set the matcha powder aside to cool while I prepare the milk froth, before combining the two for the perfect matcha latte.

Sifting the Powder

Before you begin sifting the matcha powder, make sure your milk frother is ready for the next step.

Advertisement

Sifting the powder is essential because it breaks up any clumps and ensures a smooth and fine texture. Here are some sifting techniques to keep in mind:

  • Use a fine mesh sifter or strainer to sift the matcha powder into a bowl.
  • Gently tap the strainer to help the powder pass through.
  • If there are any clumps left in the strainer, use a spoon or spatula to push them through.
  • Repeat the sifting process until all the powder is fine and smooth.

Sifting the matcha powder is crucial because it improves the flavor and texture of your latte. Once you’ve sifted the matcha powder, it’s time to move on to the next step: adding hot water.

Adding Hot Water

Next up, it’s time to add some hot water to our sifted matcha powder! This step is crucial because it affects the taste and texture of the final product. The amount of water and its temperature can make or break your matcha latte. Therefore, it’s essential to pay attention to this step.

When adding hot water to the matcha powder, it’s best to use water that’s between 160°F to 180°F. Using boiling water can burn the matcha, resulting in a bitter taste. To make sure you get the right temperature, you can use a thermometer or let the water cool down for a few minutes after boiling. The amount of water you add depends on your preference. I usually add 2-3 ounces of water for a thick and creamy matcha latte. Once you’ve added the hot water, use a bamboo whisk or a frother to mix the matcha powder until it’s fully dissolved.

With the matcha powder dissolved, we are now ready to move on to the next step of frothing the milk.

Frothing the Milk

As the milk starts to swirl around in the frother, the anticipation for the creamy and velvety texture of the frothed milk builds within. The milk frother is an essential tool for making a perfect matcha latte, as it creates the perfect texture and consistency for the milk.

Advertisement

When it comes to choosing the milk for your latte, there are different options available, such as whole milk, almond milk, or oat milk. Each type of milk will have a different texture and taste when frothed, so it’s worth experimenting with different types to find your favorite.

To froth the milk, start by adding the milk to the frother and selecting the appropriate setting. Depending on the frother, there may be different settings available, such as cold or hot frothing, or different levels of frothiness. It’s important to follow the instructions for your specific frother to achieve the best results.

Once the frothing process is complete, the milk should be aerated and have a smooth, velvety texture.

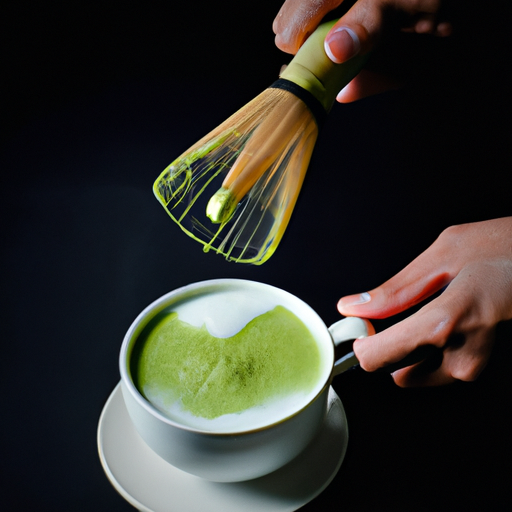
Now that the milk is frothed, it’s time to combine it with the matcha. Gently pour the frothed milk into the cup with the matcha, using a spoon to hold back the foam. Then, use a whisk to mix the matcha and milk together until they’re fully combined.

The result should be a beautiful, creamy matcha latte with a frothy layer on top.

Advertisement

Combining the Matcha and Milk

Now that we have frothed the milk to perfection, it’s time to combine it with the matcha powder. This is where the magic happens and the matcha latte comes to life. As I mentioned earlier, using a milk frother is the best way to ensure that the milk and matcha powder are mixed together thoroughly, creating a smooth and creamy texture.

Before we start, let’s talk about milk alternatives. If you prefer a non-dairy option, almond, soy, or oat milk are all great choices. However, keep in mind that the type of milk you use affects the taste and texture of the latte. For instance, almond milk is naturally sweet, while soy milk has a nutty flavor that can overpower the matcha. Experiment with different milk alternatives to find the one that suits your taste buds the best.

To combine the matcha and milk, we will use a 3 column and 4 row table to guide us through the process. The table outlines the amount of matcha powder and milk needed for different serving sizes, making it easy to adjust the recipe to your liking. Simply pour the frothed milk into the matcha powder and whisk it until it’s well combined. The result should be a vibrant green color with a creamy consistency.

Now that we have combined the matcha and milk, it’s time to add a touch of sweetness to our latte. In the next section, we will explore different sweeteners that can be used, including honey, agave, and sugar. By adding a sweetener, we can balance out the bitter notes of the matcha and create a delicious and satisfying drink.

Adding Sweetener

Now that we’ve combined our matcha and milk, it’s time to add a touch of sweetness to our latte. There are various types of sweeteners you can use, such as sugar, honey, agave nectar, or stevia.

Advertisement

However, it’s important to note that each sweetener has a different taste and level of sweetness. So, it’s best to start with a small amount and gradually add more to taste. As a general rule, for a 12-ounce latte, one to two teaspoons of sweetener should suffice.

Types of Sweeteners

Get ready to add some sweetness to your matcha latte with your preferred type of sweetener! There are a variety of sweeteners to choose from, including natural and artificial options.

Natural sweeteners, such as honey, maple syrup, and agave nectar, are often preferred for their perceived health benefits and more complex flavor profiles. On the other hand, artificial sweeteners, such as Splenda and Equal, are often used for their low calorie count and lack of impact on blood sugar levels.

When selecting a sweetener for your matcha latte, consider the flavor and nutritional profile you desire. If you prefer a sweeter, more complex flavor, natural sweeteners may be the right choice for you. If you are looking for a low calorie option that won’t impact your blood sugar levels, artificial sweeteners may be a better option.

Regardless of which sweetener you choose, be sure to add it to your matcha latte in the recommended amount to achieve the desired flavor profile.

Advertisement

Recommended Amounts

Wondering how much sweetener to add to your matcha latte? Recommended amounts vary depending on the type of sweetener you choose.

For granulated sugar, usually a teaspoon or two is enough to sweeten a cup of matcha latte. However, for liquid sweeteners like honey or maple syrup, a little goes a long way, and just a small drizzle is all you need to add a touch of sweetness to your latte.

Measuring techniques are important when adding sweetener to your matcha latte. For accurate measurements, use measuring spoons or a kitchen scale to ensure that you add the right amount of sweetener.

Additionally, if you’re using milk alternatives, keep in mind that some of them are already sweetened. For example, vanilla-flavored almond milk can add sweetness to your matcha latte, so you may not need to add as much sweetener as you would with regular milk.

Now that you know how much sweetener to add to your matcha latte, let’s move on to some tips for getting the perfect froth.

Advertisement

Tips for Getting the Perfect Froth

To achieve the perfect froth for your matcha latte, you’ll want to make sure your milk is cold and your frother is fully charged. The foam consistency of your frothed milk is crucial to the overall taste and texture of your latte.

For best results, I recommend using whole milk, as it creates a thicker and creamier froth. Skim or low-fat milk can also be used, but the resulting foam will be thinner and less stable.

In addition to using the right type of milk, the temperature of your milk also plays a role in achieving the perfect froth. Cold milk straight from the fridge works best, as it creates a denser foam and allows for better control over the frothing process. Milk that is too warm or hot will result in a thinner and less stable foam.

I recommend using a thermometer to ensure that your milk is at the optimal temperature of around 40-50°C.

Once you have your cold milk at the right temperature, it’s time to froth it using your milk frother. Be sure to follow the instructions for your specific frother, as different models may require different techniques.

Advertisement

Generally, you’ll want to hold the frother just below the surface of the milk and turn it on, slowly moving it up and down to incorporate air into the milk. Keep frothing until you achieve the desired foam consistency, then pour it over your matcha tea.

With the perfect frothed milk, your matcha latte will be smooth, creamy, and delicious.

For optional additions, you can add a sweetener like honey or agave syrup, or experiment with different types of milk such as almond or oat milk. But before you do so, make sure you’ve mastered the art of frothing milk to perfection.

Optional Additions

You might be surprised to discover that there are many ways to enhance the flavor of your matcha latte with optional additions. Here are four flavor variations that you can add to your matcha latte to make it even more delicious:

  1. Add a few drops of vanilla extract to your matcha latte for a subtle, sweet flavor.
  2. For a natural sweetness, add a teaspoon of honey to your matcha latte. This also adds a slightly floral taste to your beverage.
  3. Sprinkle a pinch of cinnamon on top of your matcha latte for a warm, spicy flavor.
  4. Substitute regular milk with coconut milk to give your matcha latte a tropical twist.

Remember to experiment with different combinations of these flavor variations to find your perfect matcha latte. Incorporating optional additions can add a whole new dimension to your matcha latte experience.

Now that you know how to add additional flavors to your matcha latte, let’s move on to troubleshooting common issues that may arise when making matcha latte with a milk frother.

Advertisement

Troubleshooting Common Issues

If encountering problems while preparing a matcha latte with a milk frother, some common issues can be easily resolved with a few simple adjustments.

One common issue is lumpy matcha. If this happens, it could be the result of adding too much matcha powder or not whisking it enough before adding the milk. To fix this, try using less matcha powder or whisking it more vigorously before adding the milk to ensure it’s fully dissolved.

Another issue that may arise is the temperature of the milk. If the milk is too hot, it can scorch the matcha and result in a bitter taste. On the other hand, if the milk is too cold, it won’t froth properly. The ideal temperature for milk when making a matcha latte is between 140-160°F. To adjust the temperature, use a thermometer to check the milk temperature before adding it to the matcha.

By adjusting these simple factors, you can easily troubleshoot any issues and create a delicious matcha latte.

Now that you’ve perfected your matcha latte, it’s time to sit back and enjoy your homemade creation!

Advertisement

Enjoying Your Homemade Matcha Latte!

As I take a sip of my homemade matcha latte, the smooth and creamy texture combined with the earthy and slightly sweet taste of matcha fills my senses with pure delight.

Not only does this beverage satisfy my cravings for something sweet, but it also provides numerous health benefits. Matcha is known for its high concentration of antioxidants, which can help fight against free radicals and reduce the risk of chronic diseases.

If you’re not a fan of dairy or just want to mix things up, there are plenty of other milk alternatives you can use in your matcha latte. Almond milk, coconut milk, and oat milk are all great options that provide their own unique flavor and texture. Plus, they’re all vegan-friendly and lactose-free, making them a great option for those with dietary restrictions.

Overall, enjoying a homemade matcha latte is not only a delicious treat but also a great way to incorporate more antioxidants and other health benefits into your diet. So go ahead and get creative with your milk alternatives and enjoy this tasty and nutritious beverage whenever you’re in need of a pick-me-up.

Frequently Asked Questions

What is the difference between ceremonial grade and culinary grade matcha?

When it comes to selecting matcha, there are two main grades to consider: ceremonial and culinary.

Advertisement

Ceremonial grade matcha is considered the highest quality and is typically used in traditional Japanese tea ceremonies. It’s made from the youngest tea leaves, which are hand-picked and ground into a fine powder. The flavor is delicate and smooth, with a slightly sweet taste and a vibrant green color.

On the other hand, culinary grade matcha is more affordable and is often used in cooking and baking. It’s made from more mature leaves and has a slightly bitter taste, making it a good choice for blending with other ingredients.

When choosing between the two grades, it really depends on what you plan to use the matcha for. If you want to enjoy it as a pure tea, go for ceremonial grade. If you plan to use it in recipes or as a flavoring, culinary grade is a better choice. If you’re unsure, look for matcha that is bright green in color, smells fresh, and tastes smooth without any bitterness.

Can I use a handheld milk frother instead of a milk frothing machine?

Using a handheld milk frother instead of a milk frothing machine can produce similar results, but the frothing technique may differ slightly. The main advantage of a handheld frother is its portability and ease of use. Simply immerse the frother into the milk and turn it on to create a frothy texture.

However, a machine frother can produce a more consistent froth and can handle larger quantities of milk. When using a handheld frother, it’s important to use a tall and narrow container to prevent splashing and ensure even frothing.

Advertisement

Overall, both options can be effective for making a matcha latte, but it ultimately depends on personal preference and the tools available.

How much matcha powder should I use for one latte?

When it comes to making a matcha latte, one of the most important factors to consider is the quantity of matcha powder you use. Generally speaking, for a standard sized latte, you’ll want to use around 1-2 teaspoons of matcha powder.

Of course, the exact amount will depend on your personal preferences and the quality of your matcha powder. When adding the matcha powder to your milk, it’s important to use proper frothing techniques to ensure that the powder is fully incorporated and that the latte has a smooth, creamy texture.

Whether you’re using a handheld milk frother or a milk frothing machine, the key is to whisk the milk and matcha powder together until frothy and well combined. With a little practice, you’ll be able to create the perfect matcha latte every time!

What are some alternative sweeteners I can use besides honey or sugar?

When it comes to sweeteners for matcha lattes, there are plenty of alternatives to honey or sugar. Stevia is a popular choice for those who want a natural, zero-calorie option. It’s made from the stevia plant and can be found in liquid or powder form.

Advertisement

Another option is maple syrup, which adds a subtle sweetness and a hint of maple flavor. Just be sure to use the real stuff and not the artificially flavored syrups.

Other alternatives include agave nectar, coconut sugar, and monk fruit sweetener. When experimenting with sweeteners, it’s important to keep in mind the potency and sweetness level of each one, so you can adjust the amount accordingly.

How long does the froth typically last before it disappears?

When it comes to froth longevity, it really depends on the type of milk frother you’re using and how well you maintain it. Generally speaking, a good quality milk frother should be able to produce froth that lasts for at least a few minutes.

However, if you don’t clean your frother regularly or if you use it too frequently, the froth may not last as long. To ensure that your frother produces long-lasting froth, it’s important to clean it after each use and to follow the manufacturer’s instructions for maintenance.

This may include descaling the frother periodically, replacing worn out parts, and using the right type of milk for frothing. By taking good care of your milk frother, you can enjoy delicious frothy drinks for years to come.

Advertisement

Conclusion

In conclusion, making a matcha latte with a milk frother is a simple and rewarding process that can be easily mastered with practice. As a matcha lover, I’ve experimented with various ingredients and techniques to perfect my homemade matcha latte.

Through trial and error, I’ve discovered that the quality of matcha powder and the temperature of the milk are crucial factors that determine the taste and texture of the latte. Additionally, adjusting the frothing time and technique can also affect the final result.

Furthermore, while preparing a matcha latte may seem like a straightforward process, there are several theories and debates surrounding the best methods and ingredients. Some argue that using a bamboo whisk to prepare the matcha powder produces a smoother and more authentic flavor, while others swear by using a milk frother for a creamy and frothy latte.

Investigating these theories and experimenting with different techniques can add depth and complexity to the writing and enhance the overall experience of making a homemade matcha latte.

Advertisement
Continue Reading
Advertisement

Matcha Tea

How To Make Matcha Tea From Powder

Published

on

By

Matcha tea serves as a soothing wind that sweeps through my senses, rejuvenating and invigorating me in the process. It has transformed into an essential part of my daily ritual, and rightly so.

Matcha tea is packed with antioxidants, vitamins, and minerals that boost my immune system, promote healthy digestion, and improve my cognitive function.

If you’re looking for a way to incorporate matcha tea into your routine, then you’re in the right place. In this article, I’ll be sharing my tips and tricks on how to make matcha tea from powder.

Whether you’re a seasoned tea drinker or a newbie to the world of matcha, this guide will help you make a perfect cup every time. So, grab your favorite mug and let’s get started.

Key Takeaways

  • Choosing high-quality matcha powder is essential for a smooth and frothy texture.
  • Use traditional tools like a bamboo whisk and prepare the tea with just below boiling water.
  • Matcha tea offers numerous health benefits due to its high antioxidant content and can support weight loss and heart health.
  • Proper storage of matcha powder in a cool and dry place can extend its shelf life up to a year.

Benefits of Matcha Tea

You’re in for a treat with matcha tea – not only does it have a delicious earthy flavor, but it’s packed with health benefits that will leave you feeling energized and refreshed.

Matcha tea is known for its powerful antioxidant properties, which help to prevent cell damage and reduce the risk of chronic diseases. In fact, matcha tea contains up to 137 times more antioxidants than regular green tea, making it one of the most potent sources of antioxidants available.

Advertisement

In addition to its antioxidant properties, matcha tea also contains a range of nutrients that can benefit your health. It’s rich in vitamins A, C, and E, as well as minerals such as potassium, calcium, and iron.

By drinking matcha tea regularly, you can help to boost your immune system, improve your heart health, and even support healthy weight loss. So, if you’re looking for a healthy and delicious beverage option, matcha tea is definitely worth considering.

Now, let’s move on to choosing the right matcha powder.

Choosing the Right Matcha Powder

When it comes to choosing the right matcha powder, there are three key points to consider: grades, flavor profiles, and quality indicators. As someone who loves matcha, I always make sure to do my research before purchasing a new brand or grade.

By understanding these factors, I can ensure I’m getting the best quality matcha powder for my needs and preferences.

Advertisement

Grades of matcha powder

The quality of matcha powder can greatly impact the taste and overall experience of your matcha tea, so it’s important to choose a grade that suits your preferences. Matcha powder grades can vary from culinary grade to ceremonial grade, and each has its own differences and uses.

Culinary grade matcha is usually cheaper and less vibrant in color, making it a good option for baking or adding to smoothies. Meanwhile, ceremonial grade matcha is the highest quality and is intended for traditional tea ceremonies. It has a bright green color, a smooth flavor, and a slightly sweet aftertaste.

To identify high quality matcha powder, look for a bright green color and a fine, powdery texture. Lower quality matcha may have a yellowish or brownish tint and a grainy texture. Additionally, ceremonial grade matcha is made from the youngest tea leaves, which are hand-picked and ground into a fine powder. The leaves are also shade-grown for several weeks before harvest, which increases the chlorophyll content and gives the matcha its bright green color.

When selecting your matcha powder, consider what flavor profile you prefer. Some matcha powders may have a more bitter taste, while others may have a sweeter or nuttier flavor. By understanding the different grades and quality indicators, you can choose a matcha powder that will create the perfect cup of matcha tea for you.

Flavor profiles

If you want to experience a taste explosion in your mouth, it’s essential to choose the right matcha grade that suits your preferences and flavor profile. Matcha powder comes in different grades, each with distinct flavor profiles.

Advertisement

For instance, sweet matcha powder has a milder flavor and tastes better when mixed with milk. On the other hand, savory matcha powder has a stronger taste and blends well with water.

When making matcha tea from powder, you also have the option of blending different grades to create a unique flavor profile. For example, mixing a little bit of sweet and savory matcha powder can create a balanced flavor that is neither too mild nor too strong.

Ultimately, the goal is to find the right blend that satisfies your taste buds. With so many options available, it’s easy to experiment and find the perfect combination that suits your preferences.

Now that you know about the different flavor profiles and blending options, it’s time to learn about quality indicators that will help you choose the best matcha powder for your needs.

Quality indicators

To truly experience the full potential of matcha, you’ll want to pay attention to quality indicators that highlight the nuances of each grade and ensure you’re getting the most flavor and health benefits out of your matcha.

Advertisement

Quality control is essential in the production and processing of matcha powder, as it can greatly impact the taste, color, and texture of the final product. Look for matcha that is bright green in color, indicating that it was grown in shade and has a high chlorophyll content. The texture should be fine and smooth, without any lumps or clumps.

Taste testing is also a crucial step in determining the quality of matcha, as it can reveal the flavor profile and overall freshness of the powder.

When preparing matcha, it’s important to use high-quality tools and ingredients to ensure the best results. A bamboo whisk, or chasen, is a traditional tool used to froth and mix the matcha powder and water together. It’s also recommended to use filtered water, as tap water can contain impurities that may affect the flavor of the tea.

By paying attention to quality indicators and using the right tools and ingredients, you can create a delicious and authentic cup of matcha tea.

Necessary Tools and Ingredients

Ready for some matcha tea? Before we begin, what do we need? A Beginner’s Guide to making matcha tea requires a few essential tools and ingredients.

Advertisement

Firstly, you need a bamboo whisk (chasen), a tea bowl (chawan), and a bamboo scoop (chashaku). These are traditional Japanese utensils that are designed to help you prepare the perfect cup of matcha tea. You can easily find them online or at your local tea store.

Secondly, you need high-quality matcha powder. You can choose from different grades of matcha powder, depending on your preference and budget. The ceremonial grade matcha powder is the highest quality and is ideal for special occasions. The culinary grade matcha powder is cheaper and is suitable for making matcha recipes for different occasions.

With these tools and ingredients, you’re ready to make some delicious matcha tea. Now, let’s move on to the next step of measuring the matcha powder.

Measuring the Matcha Powder

Now that we have our necessary tools and ingredients, let’s begin by measuring out the perfect amount of matcha for our tea.

Measuring matcha powder can be tricky, as it tends to clump together and can be difficult to get an accurate measurement. However, there are a few measuring techniques you can use to ensure that you’re using the right amount of matcha for your tea.

Advertisement

One popular method is to use a teaspoon to measure out the matcha powder. However, it’s important to note that not all teaspoons are created equal, so you may want to invest in a measuring spoon specifically for matcha.

Another tip for accuracy is to sift the matcha powder before measuring it, as this can help break up any clumps and ensure that you’re measuring an even amount.

With these measuring techniques and tips for accuracy, you can be sure that you’re using the perfect amount of matcha for your tea.

Now, let’s move on to preparing the water for our matcha tea.

Preparing the Water

First, you’ll need to heat up your water to just below boiling temperature. This is important because boiling water can actually burn the matcha powder, resulting in a bitter taste. To ensure that the water is at the right temperature, I like to use a kitchen thermometer. Ideally, the water should be between 160°F to 180°F.

Advertisement

Next, you’ll need to measure out the correct amount of water for the amount of matcha powder you’re using. A good rule of thumb is to use about 2 ounces of water for every 1/2 teaspoon of matcha powder. I find that this ratio gives the tea a nice balance of flavor and strength. Once you have your water measured out, you’re ready to move on to the next step of whisking the matcha.

Note: It’s important to pay attention to the water temperature and tea to water ratio when making matcha tea to ensure that you get the best possible taste.

Whisking the Matcha

Alright, now that we’ve got our water ready, let’s move on to the next step: whisking the matcha.

This is a crucial step in ensuring that your matcha tea turns out smooth and frothy. To achieve this, it’s important to use proper whisking technique and whisk for the right amount of time.

I’ll walk you through the steps and share some tips for getting the perfect matcha froth.

Advertisement

Proper whisking technique

To achieve a frothy and smooth texture in your matcha tea, you’ll want to whisk it vigorously using a back-and-forth motion like a ‘W’ shape. This is important because it not only provides a pleasant texture, but it also helps bring out the full flavor of the matcha.

As a matcha lover, I always start by sifting the matcha powder into my bowl to avoid clumps. Then, I add hot water and whisk vigorously until a frothy layer appears on top. It’s important to note that proper whisking technique is crucial in creating a delicious cup of matcha. Not only does it affect the texture and taste, but it also ensures that all the matcha powder is fully dissolved.

In the next section, we’ll talk about the ideal whisking time to achieve the perfect matcha tea.

Whisking time

Now that you know the proper whisking technique, you’ll want to focus on the whisking time to get the perfect cup of matcha every time.

The ideal whisking time for matcha tea is about 15-20 seconds, and the key is to whisk quickly and vigorously in a ‘W’or ‘M’motion. The faster you whisk, the more froth you’ll create, which is essential for the perfect cup of matcha.

Advertisement

If you find that your matcha is too thick or too thin, you can adjust the consistency by adding more or less water.

If you want a thicker, creamier texture, use less water and whisk for a little longer. If you prefer a lighter, smoother texture, add more water and whisk for a shorter time.

You can also experiment with different frothing techniques, such as swirling the whisk in a circular motion or tapping it against the bottom of the bowl.

Now that you’ve mastered the proper whisking technique and whisking time, it’s time to adjust the taste to your liking.

Adjusting the Taste

So now that I’ve whisked my matcha tea, it’s time to adjust the taste to my liking.

Advertisement

One way to do this is by adding sweeteners like honey, sugar, or agave syrup. I personally prefer to add a bit of honey to bring out the natural sweetness of the matcha.

Another option is to add milk or cream, which can help to mellow out the bitterness of the matcha and create a creamier texture.

Overall, adjusting the taste of matcha tea is all about finding the right balance of sweetness and creaminess to suit your personal preferences.

Adding sweeteners

Interestingly, matcha tea is naturally sweet, but for those who prefer a sweeter taste, there are many sweetener options available. Some people prefer to add honey or agave syrup to their matcha to enhance the flavor without overwhelming it. Others like to experiment with different flavor combinations by adding vanilla extract or even a touch of cinnamon.

When adding sweeteners to matcha tea, it’s important to use them in moderation. Too much sweetener can mask the delicate flavors of the tea and make it overly sweet. Once you’ve found the perfect balance, you can move on to the next step of adding milk or cream to your matcha for a creamier, richer flavor.

Advertisement

Adding milk or cream

For a creamy and indulgent sip, try adding a splash of milk or cream to your matcha. This can help mellow out the bitter taste of the tea and give it a smoother texture.

Here are some options to consider when adding milk or cream to your matcha:

  1. Cow’s milk: This is the classic option and pairs well with matcha’s grassy flavor. Use whole milk for a richer taste or skim milk for a lighter option.

  2. Almond milk: For a dairy-free alternative, almond milk is a great choice. It has a nutty flavor that complements matcha well.

  3. Coconut milk: Another dairy-free option, coconut milk adds a creamy, tropical twist to matcha.

  4. Oat milk: This trendy milk alternative has a mild, slightly sweet taste that won’t overpower the matcha.

If you’re looking for an alternative to milk, try adding a dollop of whipped cream or coconut cream to your matcha. These options will give your tea a decadent, dessert-like feel.

Once you’ve added your preferred milk or cream, it’s time to move on to serving your matcha tea.

Serving the Matcha Tea

Now that we’ve prepared our matcha tea, it’s time to serve it.

Advertisement

When it comes to serving matcha tea, there are two main styles: traditional Japanese tea ceremony and modern serving styles.

As someone who appreciates both the traditional and modern, I’m excited to explore both options and share my thoughts on each.

Traditional Japanese tea ceremony

Don’t miss out on the opportunity to experience the serene and meditative atmosphere of a traditional Japanese tea ceremony while enjoying your homemade matcha tea. The tea ceremony, also known as chanoyu or sado, is a cultural practice that originated in Japan in the 16th century. It has become a significant part of Japanese culture and is still practiced today.

Here are some important aspects of the traditional Japanese tea ceremony that you should know:

  • Origins and symbolism: The tea ceremony has deep roots in Japanese history and is closely tied to Zen Buddhism. It emphasizes simplicity, harmony, and respect for nature. The tea room is decorated with natural elements such as flowers and stones, and the ceremony itself is meant to be a calming and meditative experience.

  • Etiquette and rituals: The tea ceremony follows a strict set of rules and rituals that have been passed down through generations. Guests are expected to follow proper etiquette, such as bowing to the host and admiring the tea utensils. The ceremony also involves carefully choreographed movements, such as the way the tea bowl is held and passed between guests.

  • Tea preparation: The traditional Japanese tea ceremony involves preparing the matcha tea by whisking the powder with hot water until it becomes frothy. The tea is then served to guests in small bowls.

Immerse yourself in the rich cultural heritage of Japan by taking part in a traditional Japanese tea ceremony. After experiencing the calming and meditative atmosphere, you can explore modern serving styles that incorporate matcha tea into different types of beverages and desserts.

Advertisement

Modern serving styles

Indulging in the rich cultural heritage of Japan, you’ll find matcha-based beverages and desserts galore, proving that this vibrant, earthy flavor can be enjoyed in a wide range of creative and contemporary ways.

One of the most notable features of modern matcha serving styles is the contemporary presentation. Matcha lattes, for instance, have become a popular choice for coffee shop-goers and can be served in a variety of ways, from a classic cup to a trendy mason jar.

Matcha smoothie bowls, on the other hand, offer a unique twist on the traditional drink, served with a variety of toppings such as fresh fruit, granola, and nuts.

Serving suggestions can also vary depending on the occasion. Matcha shots, for example, can be served as a palate cleanser between courses at a fancy dinner party, while matcha cocktails can be a fun and refreshing addition to any happy hour. The possibilities are endless, and as the popularity of matcha continues to grow, so does the creativity of those who serve it.

Speaking of serving, now that we know how to make matcha tea from powder, let’s explore how to properly store it for optimal freshness.

Advertisement

Storing Matcha Powder

To keep your matcha powder fresh, make sure to store it in an airtight container in a cool, dry place. Storing matcha powder properly is important to ensure that it retains its flavor and color for as long as possible.

Here are some tips to help you store your matcha powder:

  • Keep it away from light: Matcha powder is very sensitive to light and can quickly lose its flavor and color when exposed to it. Store it in a dark place or in a container that blocks out light.

  • Avoid moisture: Moisture can make matcha powder clump and spoil quickly. Make sure to store it in a dry place, away from any sources of moisture.

  • Check the shelf life: Matcha powder can last up to a year if stored properly. Check the expiration date on the packaging and make sure to use it before it expires.

Now that you know how to store your matcha powder properly, let’s move on to some tips and tricks for making the perfect cup of matcha tea.

Tips and Tricks for Perfect Matcha Tea

Now that we know how to properly store matcha powder, let’s move on to the fun part – brewing a perfect cup of matcha tea!

As an AI language model, I don’t have any personal experience with drinking matcha tea, but I’ve learned a lot about the best brewing temperature and frothing techniques from my research.

Advertisement

First things first, the ideal brewing temperature for matcha tea is between 175-185°F (80-85°C). Boiling water can actually burn the tea leaves and result in a bitter taste. So, it’s important to let the water cool down for a few minutes after boiling before adding it to the matcha powder.

As for frothing, there are a few popular techniques like using a traditional bamboo whisk or an electric frother. Whichever method you choose, make sure to whisk the tea vigorously in a zig-zag motion to create a smooth and frothy texture.

With these tips in mind, you’re well on your way to enjoying a delicious cup of matcha tea!

Frequently Asked Questions

What is the difference between matcha powder and regular green tea?

Matcha is a type of green tea that is grown differently and undergoes a unique processing method. It has higher quality standards compared to regular green tea and is ground into a fine powder to be consumed as a whole leaf.

Can matcha tea be made with cold water instead of hot water?

Cold water matcha is possible, but hot water is recommended for a traditional taste. For a refreshing twist, try a Matcha latte recipe with cold milk.

Advertisement

How much caffeine is in a cup of matcha tea?

I love matcha tea for its unique taste and potential health benefits. A cup of matcha tea typically contains around 70mg of caffeine, which can help improve focus and metabolism.

Is it safe to consume matcha tea during pregnancy?

During pregnancy, it’s best to limit caffeine intake, including matcha tea. While matcha has many health benefits, it’s important to prioritize your baby’s safety. Let’s nurture our little ones like a garden, with care and caution.

Can matcha tea help with weight loss?

Matcha tea benefits weight loss due to its high concentration of antioxidants and metabolism-boosting properties. A simple recipe is to mix matcha powder with hot water and whisk until frothy, or try adding it to smoothies for an extra health boost.

Conclusion

Well, that’s it for my guide on how to make matcha tea from powder. I hope you found it helpful and informative!

As someone who loves matcha tea, I can honestly say that there’s nothing quite like a perfectly prepared cup of matcha. It’s not just a beverage, it’s an experience.

Advertisement

Making matcha tea is a lot like playing a musical instrument. It takes practice, patience, and a willingness to make mistakes and learn from them. But once you’ve mastered the technique, you’ll be able to create something truly beautiful and satisfying.

So go ahead, grab your matcha powder and bamboo whisk, and start your journey to becoming a matcha tea virtuoso!

Continue Reading

Matcha Tea

How To Make Matcha Taste Better

Published

on

By

As someone who loves matcha, I understand how challenging it can be to create the ideal matcha drink. It’s not solely about the powder’s quality, but the flavor as well. At times, matcha might come across as either too bitter or too plain, leading to dissatisfaction. Nonetheless, there are methods to improve its flavor and elevate the taste of matcha.

In this article, I will share my tips and tricks for making matcha taste better. From choosing high-quality matcha powder to experimenting with different sweeteners, there are several ways to improve the taste of matcha.

So, whether you’re a long-time matcha lover or a beginner, these tips will help you make a delicious cup of matcha every time.

Key Takeaways

  • Use high-quality matcha powder for better taste and health benefits.
  • Experiment with natural sweeteners and alternative milk options to balance out the bitterness and add flavor.
  • Adjust water temperature to reduce bitterness, with cooler water being ideal for most matcha grades.
  • Proper whisking techniques and storage are important in achieving a smooth and frothy texture and keeping matcha fresh.

Choose High-Quality Matcha Powder

If you want to make your matcha taste better, you should start by choosing high-quality matcha powder. Matcha grading is categorized into two types: ceremonial and culinary.

Ceremonial grade matcha is made from the youngest leaves of the tea plant and is usually more expensive than culinary grade matcha. Culinary grade matcha, on the other hand, is made from older tea leaves and is often used for cooking and baking.

To identify high-quality matcha powder, look for bright green color, a fine and soft texture, and a fresh and grassy aroma. Avoid matcha that has a yellowish or brownish tint, as it may indicate that the tea leaves were not properly processed or stored.

Advertisement

Once you have found high-quality matcha powder, you can experiment with different sweeteners to enhance the flavor of your matcha drink.

Experiment with Different Sweeteners

You might want to consider trying out different natural sweeteners, like honey or agave, to add a touch of sweetness to your cup of matcha green tea. Since matcha has a distinct flavor, it can be a bit overwhelming for some people, especially if they’re used to drinking regular green tea.

By adding a sweetener, you can balance out the bitterness and create a more enjoyable drinking experience. Additionally, you can play around with different flavor combinations to create a unique matcha blend. For example, you could add a hint of vanilla extract, cinnamon, or ginger to your matcha latte to give it a more complex taste.

Experimenting with different flavors can also help you find the perfect matcha blend for you. So, why not give it a try and see what works best for your taste buds?

When it comes to making matcha taste better, using alternative milk options is another great way to enhance its flavor.

Advertisement

Use Alternative Milk Options

Switching up your regular milk for alternative options like almond or oat milk can add a creamy texture and nutty flavor to your matcha latte, making each sip a delight for your taste buds. Not only do alternative milk options provide a unique taste, but they also have various health benefits. For example, oat milk is known to be high in fiber, protein, and vitamins A and D, while also being low in calories and fat. On the other hand, coconut milk is rich in nutrients like potassium, magnesium, and iron, making it a great option for those looking to boost their overall health.

To help you better understand the benefits of alternative milk options, I’ve created a table showcasing the nutritional value of some popular choices:

Milk Option Calories Fat Protein Fiber Vitamins/Minerals
Oat Milk 120 5g 3g 2g Vitamin A, Vitamin D, Calcium
Almond Milk 60 2.5g 1g 1g Vitamin E, Calcium
Coconut Milk 50 5g 1g 0g Potassium, Magnesium, Iron

By incorporating alternative milk options into your matcha latte, you not only enhance the flavor but also reap the benefits of various nutrients. However, if you’re feeling more adventurous, you can even blend matcha into smoothies or lattes for an added boost of energy and nutrition.

Blend Matcha into Smoothies or Lattes

To add some variety to your matcha routine, try blending it into your morning smoothie or latte. You’ll be surprised to learn that matcha contains 137 times more antioxidants than regular green tea! If you’re new to making matcha smoothies or lattes, don’t worry! Here are three easy tips to get you started:

  1. Matcha smoothie recipes: Start with a simple recipe such as a banana matcha smoothie or a matcha mango smoothie. These recipes are easy to follow and require minimal ingredients. You can also add other ingredients such as chia seeds, honey, or almond milk to give your smoothie an extra boost of flavor and nutrition.

  2. Latte art techniques: If you’re feeling creative, try making latte art with your matcha latte. You can use a milk frother to create a latte foam and then use a toothpick or small spoon to make designs on top of your latte. This is a fun way to impress your friends and family with your matcha skills.

  3. Use frozen fruits: If you want a thicker consistency to your smoothie, try using frozen fruits instead of fresh ones. This will give your smoothie a creamier texture and make it more satisfying.

Blending matcha into your smoothie or latte is a great way to incorporate this healthy ingredient into your diet. In the next section, we’ll discuss how to pair matcha with complementary flavors to enhance its taste even further.

Advertisement

Pair Matcha with Complementary Flavors

Get ready to elevate your matcha experience by pairing it with complementary flavors that will enhance its natural taste! While matcha has a distinct earthy flavor, it can be challenging to enjoy it in its purest form.

However, pairing possibilities are endless and can range from fruits like lemon and berries to nuts like almonds and pistachios. Flavor balancing techniques can help create a balance between matcha’s distinct flavor and the flavors of other ingredients.

For instance, adding a splash of milk or a dollop of honey can help mellow the bitterness of matcha. Additionally, citrus fruits like lemon or orange can help brighten its flavor. So, the next time you make a matcha latte, don’t be afraid to experiment with complementary flavors to create your own unique matcha recipe.

And if you’re feeling adventurous, try using matcha in baked goods for a delicious and healthful twist!

Use Matcha in Baked Goods

Why not jazz up your baked goods with the unique flavor and health benefits of matcha? Adding matcha powder to your desserts can give them a subtle earthy flavor and a vibrant green color. Not to mention, matcha is full of antioxidants and can boost your metabolism.

Advertisement

To incorporate matcha into your baked goods, try these tips:

  • Use matcha powder in your muffin or cake batter for a unique twist on a classic dessert.
  • Mix matcha powder into your frosting or glaze for a pop of color and flavor.
  • Experiment with savory matcha recipes, such as adding it to bread dough or using it as a seasoning for roasted vegetables.

Now that you’ve learned how to incorporate matcha into your baked goods, it’s time to adjust water temperature to ensure the perfect cup of matcha tea.

Adjust Water Temperature

I’ve found that adjusting water temperature is a key element in making matcha taste better. Using cooler water can help reduce the bitterness that matcha can sometimes have. However, it’s important to experiment with different temperatures to find the right balance for your taste preferences.

Adjust the paragraph structure in the input to logically group complete sentences on their own lines, with a double new line after. Use contractions.

Use Cooler Water to Reduce Bitterness

To avoid a bitter taste in your matcha, opt for cooler water instead of hot water. When water is too hot, it can burn the delicate tea leaves and release tannins, resulting in a bitter taste. Using cooler water, on the other hand, can bring out the sweetness and umami flavors of matcha.

Here are some tips on using cooler water to reduce matcha bitterness:

Advertisement
  • Use water that’s around 175°F (80°C). This temperature is ideal for most matcha grades, including ceremonial and culinary.
  • For lower grades of matcha, such as cooking grade matcha, you can use water that’s slightly cooler, around 160°F (70°C).
  • You can also try adding ice cubes to your water to bring the temperature down.

By using cooler water, you can enjoy the benefits of matcha without the bitter taste. In addition, using the right water temperature can also help you appreciate the different grades of matcha and their unique flavors.

In the next section, we’ll explore how experimenting with different temperatures can further enhance your matcha experience.

Experiment with Different Temperatures

As I mentioned before, using cooler water can definitely reduce the bitterness of matcha. However, there’s another technique to try when experimenting with temperatures. Have you ever tried cold brew matcha? The benefits of cold brew are numerous, including a smoother taste and a reduction in bitterness.

But don’t take my word for it, try a hot vs. cold experimentation yourself! Start by brewing your matcha with hot water as you normally would, then try brewing it with cold water the next time. You may find that you prefer one over the other, or that the temperature affects the taste of the matcha in a way that you never expected.

Either way, it’s a fun and easy way to switch up your matcha routine.

Now, onto the next section about not overworking the matcha.

Advertisement

Don’t Overwork the Matcha

Don’t overwork the matcha.

Avoid overworking the matcha as it can result in a bitter taste that may not be enjoyable for the palate. When it comes to matcha preparation, it’s important to remember that whisking techniques play a crucial role in determining the taste of your matcha.

Overworking the matcha can cause it to become bitter due to the excessive exposure of tannins, which are responsible for the astringent taste.

To prevent this from happening, it’s recommended to whisk the matcha in a gentle and circular motion. This helps to evenly distribute the powder and create a smooth and creamy texture.

It’s also important to not over-whisk the matcha as this can cause it to become frothy and less enjoyable to drink. By taking the time to properly whisk your matcha, you can enhance its flavor and create a more enjoyable drinking experience.

Advertisement

Properly storing your matcha is also important for maintaining its flavor and preventing it from becoming bitter.

Store Matcha Properly

Ensure your matcha stays fresh and delicious by properly storing it. Proper storage is key to keeping your matcha fresh and flavorful for as long as possible. Without proper storage, your matcha can quickly lose its freshness and taste.

So, how long does matcha last? The answer depends on how you store it. Matcha is a delicate tea that is highly susceptible to light, heat, and air. To keep it fresh, store it in an airtight container away from light and heat sources. The best storage practices for matcha are to keep it in a cool, dark place, such as a pantry or refrigerator. By following these simple steps, you can ensure your matcha stays fresh for up to six months.

To enjoy matcha in moderation, it’s important to take care of it properly. By storing it correctly, you can keep it fresh and delicious for longer, allowing you to savor its unique taste and benefits.

Enjoy Matcha in Moderation

I want to talk about the importance of enjoying matcha in moderation. It’s easy to get carried away with the delicious flavor and health benefits, but it’s important to remember not to overdo it.

Advertisement

By savoring and enjoying the flavor, we can truly appreciate the unique taste and experience the full benefits that matcha has to offer.

Don’t Overdo It

Hey, if you want to make your matcha taste better, remember not to go overboard with the amount of powder you use. It’s easy to think that more matcha means better taste and more health benefits, but that’s not the case. Using too much matcha powder can actually make it taste bitter and unpleasant. It’s all about balancing flavors and using proper measuring techniques to get the perfect cup of matcha.

To help you get started, here’s a table to guide you on the right amount of matcha powder to use depending on the serving size:

Serving Size Matcha Powder
1 teaspoon 1 gram
2 teaspoons 2 grams
3 teaspoons 3 grams

Remember to use a whisk to mix the matcha powder with water or milk to achieve a smooth and frothy texture. With the right amount of matcha powder, you can enjoy the delicious flavor and health benefits of matcha without going overboard. So savor and enjoy the flavor and health benefits of matcha in moderation.

Savor and Enjoy the Flavor and Health Benefits

Indulging in the delicious flavor and reaping the health benefits of matcha can be a delightful experience when consumed in moderation. To truly enjoy the flavor and health benefits of matcha, it’s important to savor and appreciate every sip.

Advertisement

Here are some tips and techniques I’ve found helpful in fully enjoying my matcha:

  • Take a moment to appreciate the aroma of the matcha before taking a sip. The earthy and grassy scent can be calming and invigorating at the same time.
  • Try different matcha brewing techniques to find the one that suits your taste buds. Some people prefer a thicker, creamier consistency while others prefer a lighter, frothier texture.
  • Incorporate matcha into your tea ceremony routine. This traditional Japanese practice involves taking time to prepare and serve matcha with respect and mindfulness.
  • Take small sips and let the matcha linger in your mouth before swallowing. This allows you to fully appreciate the flavor and texture of the matcha.
  • Use high-quality matcha powder to ensure the best taste and health benefits.

By following these tips and taking the time to savor and enjoy every sip, you can truly appreciate the delicious flavor and numerous health benefits of matcha tea.

Frequently Asked Questions

What is matcha powder made of?

I know you might be thinking matcha is some new trendy powder, but it’s actually been a part of traditional Japanese tea ceremonies for centuries. Matcha is made from shade-grown green tea leaves, using specific cultivation techniques to produce a unique flavor profile.

How much caffeine is in a serving of matcha?

I love matcha for its unique taste and health benefits. As for the Matcha caffeine content, a standard serving has roughly 70mg. I enjoy experimenting with different matcha tea recipes to find my perfect cup.

Can matcha powder be used in savory dishes?

Yes, matcha powder can be used in savory dishes. I’ve experimented with matcha in marinades, dressings, and even savory baked goods. Matcha pairs well with umami flavors like soy sauce, miso, and mushrooms.

What are the health benefits of matcha?

Oh, the joys of matcha! Who needs health benefits when you can indulge in matcha smoothies and baked goods? But if you must know, matcha is packed with antioxidants and boosts metabolism.

Advertisement

How long does matcha powder stay fresh once opened?

Once opened, matcha powder stays fresh for about 6 months if stored properly in an airtight container in a cool, dry place. Storing matcha properly is key to maintaining its quality and flavor.

Conclusion

In conclusion, I hope these tips have helped you discover how to make matcha taste better. Remember to always choose high-quality matcha powder and experiment with different sweeteners and milk options. Don’t be afraid to blend matcha into smoothies or lattes or pair it with complementary flavors.

As the old saying goes, "Moderation is key."While matcha has many health benefits, it’s important to enjoy it in moderation and not overwork the powder. Lastly, make sure to store your matcha properly to maintain its freshness.

With these tips, you’ll be able to enjoy a delicious and satisfying cup of matcha every time.

Advertisement
Continue Reading

Matcha Tea

How To Make Matcha Macarons

Published

on

By

Hey, matcha and macaron lovers! Ever thought about smashing these two yummy goodies together into a mind-blowing sweet treat?

That’s right, today I’m going to show you how to make matcha macarons! Making macarons can seem intimidating, but with a little patience and practice, it’s actually quite simple.

And when you add the unique flavor of matcha to the mix, you’ll have a dessert that’s sure to impress your friends and family. So, let’s get started on this fun and tasty adventure!

Key Takeaways

  • Matcha macarons require precision and attention to detail, but can be made with patience and practice.
  • Making macarons involves using a stand or hand mixer, piping bag and tip, parchment paper, and a baking sheet, as well as following certain techniques like macaronage and resting the shells before baking.
  • Matcha filling can be customized with different flavors and additions like vanilla extract, chopped nuts, white chocolate chips, or honey.
  • Matcha macarons pair well with green tea, coffee, champagne, fruits, or ice cream, and can be presented in a visually appealing way to enhance their overall appearance.

Gather Your Ingredients and Equipment

You’ll need to gather all your ingredients and equipment before diving into the delicious world of matcha macarons, so grab your apron and get ready to bake!

The equipment essentials include a stand mixer, piping bag, piping tip, parchment paper, and a baking sheet. If you don’t have a stand mixer, a hand mixer will work just fine. And if you don’t have a piping bag or tip, you can use a plastic bag with the corner snipped off.

Now, let’s talk about the ingredients. The main ingredient in matcha macarons is, of course, matcha powder. You can find this at most specialty food stores or online. Other ingredients include almond flour, powdered sugar, egg whites, granulated sugar, and cream of tartar.

Advertisement

If you don’t have almond flour, you can substitute it for finely ground almonds. And if you don’t have cream of tartar, you can substitute it for lemon juice or white vinegar.

Once you have everything you need, it’s time to prepare your matcha filling.

Prepare Your Matcha Filling

Once the butter and sugar are creamed together, the mixture should be light and fluffy like whipped cream, giving the filling a cloud-like texture that will melt in your mouth.

To add a matcha flavor to the filling, I recommend using high quality culinary grade matcha powder. You can adjust the amount of matcha powder to your preference, but I usually use about 2 teaspoons for a subtle matcha flavor and up to 4 teaspoons for a stronger flavor.

If you want to experiment with different filling options, there are many possibilities. You can add a touch of vanilla extract or almond extract for a more complex flavor profile. You can also add some finely chopped nuts, such as pistachios or almonds, for a crunchy texture. Or, if you prefer a sweeter filling, you can add some white chocolate chips or a drizzle of honey.

Advertisement

The possibilities are endless, so have fun and get creative! Now, let’s move on to making the macaron shells.

Make the Macaron Shells

Alright, it’s time to make the macaron shells.

First, I mix together the batter to get the perfect consistency.

Then, I pipe the batter onto the baking sheets, making sure to leave enough space between each shell.

Finally, I let the shells rest for a bit before popping them in the oven.

Advertisement

Mixing, piping, and resting – these are the three key steps to making the perfect macaron shells.

Mixing the Batter

Now it’s time to get your arms working and mix the batter until it’s smooth and shiny! Before you start mixing, it’s important to note that the key to successful macarons lies in the mixing techniques. Over-mixing can cause the batter to be too runny, while under-mixing can result in cracked shells. So, be sure to mix the batter just right!

To begin, I start by folding the dry ingredients into the egg white and sugar mixture. I use a spatula to fold the ingredients in gently, making sure to scrape the sides and bottom of the bowl.

Then, I use the macaronage technique to mix the batter. This involves folding the batter over itself until it becomes smooth, shiny, and has a lava-like consistency.

Once the batter has reached the perfect consistency, it’s time to pipe it onto baking sheets. With a piping bag and round tip, I pipe the batter into small circles onto a baking sheet lined with parchment paper. Remember to leave enough space between each circle to allow for spreading during baking.

Advertisement

With the batter mixed and piped, it’s time to move on to the next step – baking the macaron shells to perfection!

Piping onto Baking Sheets

Using a piping bag and round tip, I carefully squeeze out small dollops of the batter onto the parchment-lined baking sheets, creating perfectly shaped circles that will soon turn into delicate macaron shells. It can be tricky at first, but with some practice techniques and the right piping tips, it becomes easier to achieve consistent and uniform shapes. I make sure to leave enough space between each dollop to allow for the batter to spread out slightly and form the signature macaron feet.

To make the piping process even easier, I like to use a template underneath the parchment paper. This can be as simple as drawing circles onto a piece of paper and placing it underneath the parchment, or using a silicone mat with pre-drawn circles. It helps me keep the size and spacing consistent, and ensures that each macaron shell is the same size. Once all the batter has been piped onto the baking sheets, I gently tap them on the counter to release any air bubbles and let them rest for a bit before placing them in the oven.

Resting the shells is an important step in the macaron-making process, as it allows the shells to develop a thin, dry layer on the surface before baking. This helps to create the characteristic smooth and shiny surface of the macaron shells, and ensures that they rise properly in the oven.

Resting the Shells

Before you pop your macaron shells in the oven, it’s important to let them rest for a bit to allow for a smooth and shiny surface to develop. Resting the shells is a crucial step that shouldn’t be skipped.

Advertisement

This allows the macaron shells to develop a thin film on the surface, which will help them rise evenly while baking. Once piped, let the shells rest at room temperature for 30 minutes to an hour, or until the surface is dry to the touch.

Tips for maximizing shell resting time include placing the baking sheets on a flat surface and covering them with a clean kitchen towel to prevent them from drying out. You can also turn on a fan or air conditioner to reduce humidity in the room, as moisture can prolong the resting time.

To know when your macaron shells are ready for baking, gently touch the surface of the shells with your fingertip. If the shells aren’t sticky and feel dry to the touch, they’re ready for baking.

Once your macaron shells have rested, it’s time to bake and cool them.

Bake and Cool the Macaron Shells

Alright, now that we’ve made the macaron shells, it’s time to get them baked and cooled.

Advertisement

First things first, I’m going to preheat my oven to 300°F. Once it’s heated up, I’ll pop in my macarons and bake them for about 15-18 minutes, making sure to rotate the tray halfway through.

After they’re done, I’ll let the shells cool completely on the tray before removing them.

Preheating the Oven

Now’s the time to warm up your oven to the perfect temperature, allowing the matcha macarons to bake into a delicate, crispy texture with a soft and chewy interior. Preheating the oven is an essential step in baking macarons, as it ensures that the shells are cooked evenly and rise properly.

Here are some benefits of preheating and common preheating mistakes to avoid:

  • Benefits of Preheating:

  • Helps to activate the baking powder and baking soda for better texture and rise

  • Ensures that the macarons are baked at a consistent temperature

  • Reduces the risk of undercooked or overcooked macarons

  • Improves the overall quality and appearance of the macarons

  • Common Preheating Mistakes:

  • Not preheating long enough or at the correct temperature

  • Opening the oven door too frequently, which causes temperature fluctuations

  • Overcrowding the oven with too many baking sheets

  • Neglecting to use an oven thermometer to ensure accuracy

With the oven preheated and the macaron shells ready to go, it’s time to move on to the next step: baking time and temperature.

Advertisement

Baking Time and Temperature

To achieve perfectly baked macarons, you’ll want to ensure that the oven temperature is set to the right degree and that the baking time is just right. Adjusting oven settings can be the difference between a successful batch and a disaster. I recommend preheating your oven to 300°F (150°C) and placing the baking tray on the middle rack. Use an oven thermometer to confirm the temperature is accurate. If your oven tends to run hot, lower the temperature to 275°F (135°C) to prevent browning too quickly.

Once you’ve confirmed the oven temperature is correct, it’s time to bake the macarons. The baking time and temperature will vary depending on your oven and the size of your macarons. For reference, I bake my 2-inch macarons for 18-20 minutes at 300°F (150°C). To help keep track of the baking time, I recommend using a timer or setting an alarm on your phone. Check for doneness by gently touching the top of the macaron shells. If they are firm and do not wiggle, they are ready. Once baked, transfer the baking sheet to a cooling rack to cool the shells.

Cooling the Shells

Once the macarons are done baking, you’ll want to be careful when handling them and let them cool completely on the baking sheet before removing them. This ensures that the delicate shells don’t break or stick to the surface.

Here are some tips on how to cool the shells before filling them:

  1. Using a fan: You can speed up the cooling process by using a fan. Simply place the baking sheet in front of a fan and let the air circulate around the shells. This will help them cool down faster and prevent them from becoming soggy.

  2. Refrigerating the shells: Another way to cool the shells is to refrigerate them. Once the macarons come out of the oven, transfer the baking sheet to the refrigerator and let them cool for at least 10 minutes. This will help the shells set and prevent them from cracking when you handle them.

  3. Don’t touch the shells: It’s important to resist the temptation to touch the shells while they’re still warm. They need time to cool and set before you can remove them from the baking sheet.

  4. Check for doneness: Before you start filling the macarons, make sure they’re completely cooled and set. You can test this by gently pressing on the top of a shell. If it feels firm and doesn’t move, it’s ready to be filled.

Now that the shells are cooled and ready, it’s time to fill them with your favorite matcha filling.

Advertisement

Fill the Macarons

Now comes the fun part – filling the macarons! I love piping the filling onto each shell and seeing the vibrant colors and flavors come to life.

Once all the shells are filled, it’s time to sandwich them together and create the perfect macaron. It’s important to be gentle when sandwiching the shells, so as not to crush the delicate meringue.

Piping the Filling

Next up, it’s time to grab your piping bag and fill it with the matcha filling. When it comes to decorating techniques, piping the filling is one of the simplest and most effective methods.

To begin, cut the tip off of your piping bag and attach the desired piping tip. Then, spoon the matcha filling into the bag, being careful not to overfill it. You want to have enough filling to pipe, but not so much that it will be difficult to control.

When it comes to flavor pairings, matcha is a versatile ingredient that can be paired with a variety of flavors. Some popular options include white chocolate, lemon, and raspberry. However, for these matcha macarons, we’ll simply be filling them with a generous amount of matcha buttercream.

Advertisement

Once your piping bag is filled with the matcha filling, it’s time to move on to the next step: sandwiching the shells.

Sandwiching the Shells

To assemble the delicate treats, gently press two shells together with a generous dollop of the matcha buttercream filling in between. The filling should be piped onto one shell, leaving a small border around the edge, before being topped with the other shell. Press down lightly to create the perfect sandwich.

Flavor options for the filling are endless – try adding a hint of vanilla or a sprinkle of cinnamon for a unique twist. Additionally, filling techniques can vary, from using a piping bag to spreading the filling gently with a spoon. Whatever method you choose, be sure to handle the macarons with care to avoid cracking the delicate shells.

With a little practice, you’ll be able to create bakery-worthy matcha macarons that will impress any guest. Now, onto how to store and serve your beautiful creation.

Store and Serve

Don’t forget to showcase your beautiful matcha macarons by presenting them on a decorative platter or cake stand! Presentation is key when it comes to desserts, especially ones as delicate and intricate as macarons. You want to make sure your guests can admire your hard work and appreciate the beautiful green color of the matcha shells.

Advertisement

To really elevate the presentation, consider pairing your matcha macarons with complementary flavors. Some flavor combinations that work well with matcha include white chocolate, raspberry, and black sesame. You can also add a touch of gold or silver edible glitter to add some sparkle and glam to your display. Remember, presentation tips can make all the difference in making your desserts look as good as they taste.

Now, if you run into any issues during the macaron making process, don’t worry! Troubleshooting tips are on the way.

Troubleshooting Tips

If you’re facing issues with your delicate confections, these troubleshooting tips will come in handy. Making matcha macarons can be a challenging task, but with a few adjustments, you can get the perfect result you’re looking for. Here are some common mistakes you should avoid and how to fix them:

  1. If your macarons have cracked shells, it’s usually a sign that the batter is too dry or that you’ve overmixed it. To fix this, add a few drops of water to your batter and mix it gently until it’s smooth.

  2. If your macarons have hollow shells, it’s usually a sign that you’ve overmixed the batter or that your oven temperature is too high. To fix this, try reducing the mixing time and lowering the oven temperature.

  3. If your macarons have uneven feet, it’s usually a sign that your oven temperature is uneven, or your baking sheet is warped. To fix this, try using a silicone baking mat or rotating your baking sheet halfway through baking.

  4. If your macarons are sticking to the parchment paper after baking, it’s usually a sign that they’re undercooked. To fix this, bake your macarons for a few more minutes until they’re fully cooked.

Now that you’ve mastered the art of making matcha macarons, it’s time to experiment with flavor variations.

Experiment with Flavor Variations

Get creative with your macaron flavors by trying out different combinations of fillings! Flavor experiments are a fun way to add your own unique twist to the classic matcha macaron recipe.

Advertisement

Some of my favorite flavor pairings include raspberry and white chocolate, or lemon and lavender. You can also experiment with different textures, like adding a crunchy hazelnut praline filling or a creamy ganache.

Presentation ideas are also a fun way to make your matcha macarons stand out. Try coloring the shells with different shades of green to create an ombre effect, or decorate with edible gold leaf for a touch of elegance. Don’t be afraid to get creative with your presentation, as it can make a big difference in how your macarons are received.

And remember, practice makes perfect!

Practice Makes Perfect

You’ll see a noticeable improvement in your macaron-making skills with consistent practice and patience. Making matcha macarons, or any type of macaron for that matter, requires precision and attention to detail.

Here are some practice tips to help you perfect your macaron-making skills:

Advertisement
  • Use a kitchen scale to measure ingredients accurately
  • Mix the ingredients just until the batter is smooth and glossy
  • Let the macarons rest before baking to ensure a smooth and even surface
  • Experiment with different piping techniques to find the one that works best for you

It’s important to remember that mistakes are common when making macarons. Don’t get discouraged if your first few batches don’t turn out perfectly. Keep practicing and you’ll soon be able to make beautiful and delicious matcha macarons.

With your newly acquired macaron-making skills, it’s time to enjoy your delicious matcha macarons!

Enjoy Your Delicious Matcha Macarons!

Now it’s time to savor every bite of these heavenly treats and experience pure bliss with each chewy, flavorful macaron. But before you do that, let me share with you some presentation tips that will make your matcha macarons look even more appetizing.

You can dust some matcha powder on top of the macarons or sprinkle some edible gold dust for an extra touch of elegance. You can also pipe some whipped cream or ganache in the center of the macaron for a surprise filling. Just make sure to refrigerate the macarons first before filling them to prevent them from getting too soft.

As for pairing suggestions, matcha macarons go well with a variety of beverages such as green tea, coffee, and even champagne. You can also pair them with some fresh fruits like strawberries or raspberries for a fruity contrast to the earthy matcha flavor. Another option is to serve them with some creamy ice cream for a decadent dessert.

Whatever your choice may be, one thing is for sure, your matcha macarons will be the star of the show and will leave your guests begging for more.

Advertisement

Frequently Asked Questions

Can I use regular green tea powder instead of matcha powder for this recipe?

While regular green tea powder may seem like a substitute for matcha powder, it won’t yield the same flavor or health benefits. Consider using it for other recipes. When making macarons, consistency and oven temperature are key.

How long will the macarons stay fresh if stored properly?

I’m happy to share my tips on maximizing the shelf life of macarons. Proper storage is key – keep them in an airtight container in the fridge and they’ll stay fresh for up to a week.

Can I freeze the macarons for future consumption?

Yes, I can freeze Macarons for future consumption. It extends the shelf life for two to three months. I can also experiment with alternative fillings and flavors after thawing.

How do I know if I’ve over- or under-mixed the macaron batter?

When making macarons, common mistakes include over or under-mixing the batter. To troubleshoot, I check for the right consistency – it should flow like lava. To fix over-mixing, I add more dry ingredients. For under-mixing, I gently fold the batter a few more times.

Can I use a different type of filling besides matcha for these macarons?

Wow, the possibilities for different filling options and flavor variations are endless! While matcha is a great choice, I’ve experimented with everything from raspberry jam to salted caramel. Don’t be afraid to get creative and try out new combinations.

Advertisement

Conclusion

Well, there you have it! Making matcha macarons may seem daunting, but with the right ingredients, equipment, and a little practice, you can create a delicious dessert that will wow your loved ones.

Remember to take your time, follow the steps closely, and don’t hesitate to experiment with different flavors and fillings. As the saying goes, Rome wasn’t built in a day, and neither are perfect macarons.

But with each attempt, you’ll learn something new and get closer to achieving that perfect, delicate texture and flavor. So, don’t be discouraged if your first batch isn’t perfect – keep practicing and soon enough, you’ll be whipping up matcha macarons like a pro.

Now, go forth and impress your taste buds (and your friends) with your newfound macaron-making skills!

Advertisement
Continue Reading

Trending